
I tested this recipe four times last October. My kitchen was a complete disaster zone. Flour coated my cabinets, powdered sugar dusted my eyebrows, and my trash can was overflowing with soggy paper towels and empty pumpkin puree cans. I was on a mission to fix what is easily the biggest scam in the fall baking universe: dry, dense, cakey pumpkin cinnamon rolls that taste like disappointed bread.
Let me be completely honest with you. Most pumpkin cinnamon roll recipes on the internet are absolute garbage. Food bloggers love dumping half a can of watery pumpkin straight into dough, panic when it turns into sticky swamp slime, dump four extra cups of flour in, and hand you a recipe for pumpkin-flavored hockey pucks. We are not doing that today.
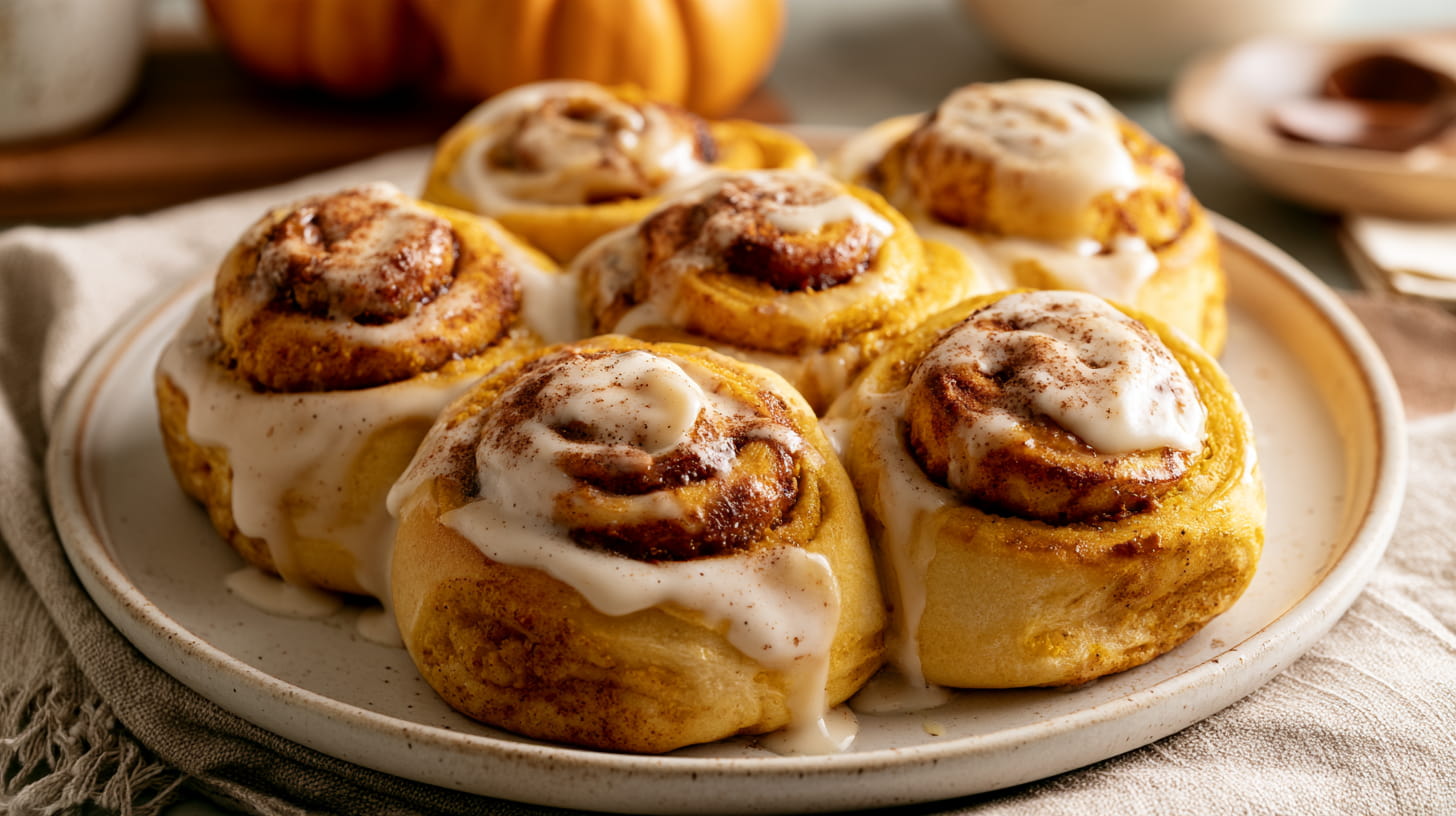
We are making giant, pillowy, bakery-style pumpkin rolls that practically melt in your mouth. The spirals are dripping with dark brown sugar and warm spices. The tops are drowned in a nutty brown butter maple cream cheese frosting that sinks deep into every crevice.
Make a batch on Saturday morning, put the coffee pot on, and prepare to have everyone in your house worship you.
Why Most Pumpkin Rolls Fail (And Why This One Works)
Pumpkin is a notoriously tricky ingredient in yeast doughs. It is packed with moisture, roughly 90 percent water by weight, but it brings almost zero structure to the party. When you dump raw pumpkin into flour, all that free water throws your hydration ratio completely out of whack.
You end up with dough that sticks to everything it touches. The average home baker panics and starts shoveling in extra flour. Before you know it, you have completely killed the gluten development and created a dense, heavy roll that dries out ten minutes after leaving the oven.
My recipe solves this with two stupidly simple techniques. First, we blot the pumpkin. We squeeze the excess water out before it ever touches the flour, leaving behind pure, concentrated pumpkin flavor and natural orange color. Second, we soak the rolls in warm heavy cream right before they hit the oven.
That cream soak is the famous Cinnabon bakery hack. As the rolls bake, the warm cream mixes with the brown sugar filling pooling at the bottom of the pan. It creates a rich, sticky caramel sauce while steaming the dough from the inside out. The result is a bun that stays impossibly soft for four straight days.
“Never use a chef knife to slice soft yeast dough. A knife crushes the layers together into sad pancakes. Use plain dental floss to pull clean, perfect spirals every single time.”
The Three Non-Negotiable Secrets to Insane Texture
If you want people begging for this recipe, you cannot cut corners on these three steps. I made every rookie mistake in the book so you do not have to.
Secret One: Blot That Pumpkin. Take a stack of three paper towels. Spread your pumpkin puree across them. Press another paper towel on top. You will be horrified by how much dirty orange water comes out. Measure your half cup after blotting, not before. You want concentrated pumpkin flesh, not pumpkin swamp water.
Secret Two: Use Unflavored Dental Floss. A knife presses down on the log, squishing the delicate layers together and ruining your beautiful rise. Slide a strand of plain, unflavored dental floss underneath the rolled log, cross the ends over the top, and pull sharply in opposite directions. It slices clean through the dough like a laser beam without flattening a single spiral.
Secret Three: The Two-Stage Frosting Slap. Do not wait for the rolls to cool down completely before frosting. And definitely do not dump all the frosting on at once. Spread half of your brown butter maple frosting over the rolls while they are still steaming hot out of the oven. The warmth melts the frosting down into the spiral crevices like a glaze. Then, let the pan sit for ten minutes and slather the rest on top for that thick, luscious bakery crown.
Substitutions and Dietary Swaps
Baking is a science, but you still have plenty of room to tweak things depending on what is sitting in your pantry or who is gathered around your breakfast table.
Flour Choices: I swear by bread flour for this recipe. The higher protein content develops stronger gluten, giving you that stretchy, bakery-style chew that holds up to the heavy pumpkin. If you only have all-purpose flour in your pantry, you can still use it. Just expect a slightly softer, more cake-like crumb.
Make it Dairy-Free: Swap the whole milk for warm unsweetened oat milk. Use a high-quality vegan block butter (like Miyoko’s) for the dough and the brown sugar filling. For the pre-bake soak, use full-fat canned coconut milk instead of heavy cream. Finish with dairy-free cream cheese for the frosting. It works shockingly well and keeps the exact same gooey texture.
Fresh Pumpkin vs. Canned: Stick with canned pure pumpkin puree (like Libby’s). Fresh homemade pumpkin puree has wildly unpredictable water content, which makes yeast baking a dangerous gamble. If you must use fresh pumpkin from your garden, cook it down in a skillet on the stove until it resembles a thick tomato paste before adding it to your mixer.
Spicing it Up: If you do not have store-bought pumpkin pie spice, do not run to the grocery store in a panic. Mix together ground cinnamon, ginger, nutmeg, allspice, and a tiny pinch of ground cloves. Crank up the cinnamon if you prefer a sharper kick in the morning.
Bennett’s Troubleshooting Guide
Did something go sideways while you were baking? Here is how to diagnose and fix it in real time.
Why is my dough so sticky? Pumpkin dough is inherently stickier than standard brioche. Resist the urge to dump in cups of extra flour. Let the stand mixer knead it for the full ten minutes. As the gluten network forms, the dough will smooth out and pull away from the sides of the bowl. If it is still unmanageable after ten minutes of kneading, add flour one single tablespoon at a time until workable.
Why did my rolls take forever to rise? Pumpkin dough is heavy, rich, and dense with butter. It naturally rises slower than lean pizza dough. If your kitchen is cold, your yeast goes right to sleep. Put your bowl inside an unheated oven with the interior oven light switched on. That tiny light bulb creates a cozy 78-degree proofing box that wakes your yeast right up.
Can I make these the night before? Yes, and you honestly should. Roll and slice the dough on Friday evening. Place the cut rolls in your greased baking dish, cover tightly with plastic wrap, and stick them straight into the fridge overnight. The next morning, pull the dish out, let the rolls sit on the counter for 45 minutes to take off the chill and finish rising, pour your warm cream over top, and bake. Fresh, hot cinnamon rolls without waking up at five in the morning.
Storage and Next-Day Revival
Cinnamon rolls are always best twenty minutes after leaving the oven, but these hold up remarkably well if you somehow end up with leftovers.
Counter Storage: Keep the baking dish covered with foil or plastic wrap at room temperature for up to two days. Because of the cream cheese frosting, if your kitchen runs hot, move them to the fridge after day one.
Fridge Storage: Store leftovers in an airtight container for up to five days. The dough will firm up due to the butter, so never eat them cold straight from the fridge unless you want a mouthful of chilled dough.
The Ten-Second Magic Trick: Pop a single roll onto a microwave-safe plate. Zap it on high for ten to fifteen seconds. The butter inside the dough softens immediately, the brown sugar gets syrupy again, and the cream cheese frosting turns into warm silk. It tastes like it was baked five minutes ago.